
Knowledgebase
August 13th - PEAK Advanced PCSOT Training Webinar registration now available!
Learn More
Question Last Updated on: 8/12/2026
The Masseter Audio Bridge lets the examiner and the person being tested talk to each other through their headsets while an examination is running. Think of it like an intercom: when it is switched on, whatever the examiner says into their headset microphone is heard in the other person's headset, and whatever that person says is heard in the examiner's headset.
A headset is a pair of headphones with a small microphone attached. This feature uses two headsets: one worn by the person being tested (the Subject) and one worn by the person running the test (the Examiner).
You choose the two headsets once. After that, you switch the sound on when you need it and off when you do not. It is best to leave it switched off when you are not using it, because while it is on it keeps both microphones busy.
Two people wear headsets, and it is important not to mix them up. In LXEdge:
A few simple habits will keep the two headsets from getting confused:
Remember the simple rule: the Subject is the person sitting in the chair being tested, and the Examiner is the person asking the questions.
Do a quick check before you start. Say a few words into your microphone and make sure the subject can hear you, then ask the subject to speak and make sure you can hear them.
Plug both headsets into the computer before you begin, then follow these steps:
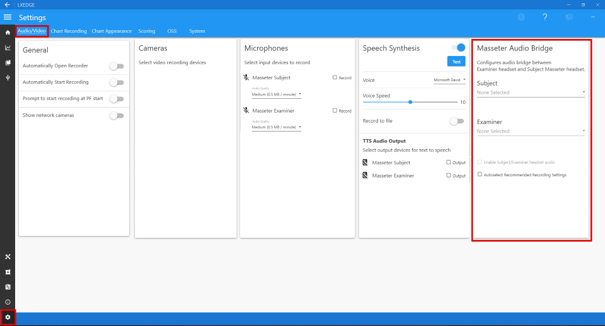
This window displays the Settings gear, the Audio/Video tab, and the Masseter Audio Bridge panel.
When you select a headset, LXEdge shows its microphone and speaker just underneath the box, so you can double-check that you picked the right one.
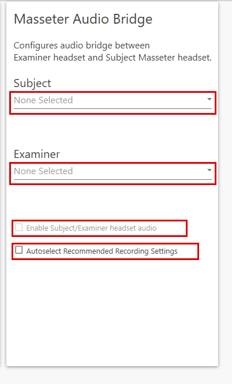
Selecting headsets in this window does not start the sound yet. It only tells LXEdge which headsets to use. You turn the sound on in a later step.
You use a Custom Headset when there is no Masseter Examiner headset to use. For example, when the examiner is wearing an ordinary headset instead of the special Masseter Examiner headset. LXEdge lets you use that ordinary headset for the examiner's side; you simply tell it which microphone and which speaker the headset uses. The steps below go through it slowly, one small piece at a time.
The microphone is the part you talk into. The speaker (LXEdge sometimes calls this the "output") is the part you listen through. For the sound to travel both ways, LXEdge needs to know two things about the examiner's headset: which microphone to listen to, and which speaker to send the sound to. With a Custom Headset, you need to point these out yourself.
Follow these steps:
A few tips to make this easier:
If you cannot determine which microphone or speaker in the list belongs to your headset, try this simple trick. Unplug the headset from the computer and look at the list, then plug it back in and watch which new name appears. The name that pops up when you plug the headset in is the one to choose.
Choosing a Custom Headset does not turn the sound on by itself. After you have made your two choices, you still need to switch the sound on. See "Turning the Sound On and Off" just below.
The Custom Headset choice is only for the Examiner. The subject's headset is still chosen the normal way, in the box under Subject.
If you unplug the headset later, or move to a different computer, you may need to choose it again.
If there is no Masseter Examiner headset plugged in, LXEdge offers you the Custom Headset choice automatically, so you can use an ordinary headset for the examiner instead. (See steps 1-5)
Leave it turned off when you are not using it.
Tip: right after you turn it on, test both directions. Say something and check the subject hears you, then have the subject speak and check that you hear them. If only one direction works, turn it off and on again.
There is a tick-box named Autoselect Recommended Recording Settings. If you tick it, LXEdge automatically records the sound from the subject's headset for you, so you do not have to set it up by hand. Leave it unticked if you prefer to choose what gets recorded yourself.
The "Enable Subject/Examiner headset audio" box is grey and I cannot click it.
You have not chosen a headset in both boxes yet. Choose one headset under Subject and one under Examiner. As soon as both are chosen, the box can be ticked.
The Subject or Examiner box only displays "None Selected" and no headsets are available.
This usually means LXEdge has not picked up the headsets yet. Make sure both headsets are plugged into the computer, wait a few seconds, then click a different tab (such as System) and click Audio/Video again, so LXEdge looks for them once more.
Software displays message stating "No Masseter headset was detected."
This just means no Masseter headset is plugged in. Check that each headset is pushed firmly into its socket. If the examiner is using an ordinary headset instead of a Masseter one, use the Custom Headset option (see "Using a Custom Headset for the Examiner") to choose the microphone and speaker yourself.
There is no sound, or the sound only goes one way.
First, make sure you have ticked the Enable Subject/Examiner headset audio box. If it is on and you still have trouble, turn it off and back on again. Check that the correct headset is chosen in each box, that the volume is turned up, and that neither headset is muted.
The subject and examiner sound swapped, or the wrong person is heard.
The headsets may be chosen in the wrong boxes. Make sure the headset the subject is wearing is chosen under Subject, and the one you are wearing is chosen under Examiner. Labelling the headsets (see "Knowing Which Headset Is Which") prevents this.
Another part of LXEdge says a microphone is busy or in use.
The bridge holds both microphones while it is switched on. Turn the bridge off when you are not using it and close any other program that might be using the headsets.
I closed LXEdge and the sound was turned off when I opened it again.
This is normal. The headsets you chose are remembered, but the examiner turns the sound on each time it is needed. Just tick the Enable Subject/Examiner headset audio box again.
Unable find an answer to the question that you looking for in our FAQ section? Submit your question directly to our customer service representatives.
Join our email list for up-to-date product news Sign Me Up!

3700 Sagamore Pkwy N
Lafayette, IN 47904
Phone: (765) 423-1505
Fax: (765) 423-4111
info@lafayetteinstrument.com
Copyright © 2009 - 2026 Lafayette Instrument Company. All Rights Reserved.