Knowledgebase
New PEAK Online Courses now available!
Learn More
Question Last Updated on: 7/31/2025
LXEdge provides fully customizable series templates, allowing examiners to create pre-defined templates for gathering information in various testing scenarios. These templates store that information about a series, including details about the examinee that the examiner collected just before an exam. The information is stored in fields, and are included within a larger set of information. Think of a field like a box that holds one specific detail. Each field contains one type of information, such as the exam location, the examinee's sleep quality & quantity, recent meal history, and the examiner's name, if desired. Templates can be saved for future use and duplicated to create new ones for different testing needs. It's important to note that any changes to series templates will only affect new PFs; existing PFs will retain the settings of the template used at their creation. Many examiners will find that once they create a Series Template for a testing situation, that will become their personal default Series template for that type of testing. The Series Templates will be embedded in a PF template, which will be explained in the PF Template training section.
LXEdge includes a Default Series Template with the following categories
Each group contains relevant fields. For example, the Food group contains fields to gather information about if the examinee has eaten prior to the polygraph. Groups and fields are fully customizable.
To access the Default Series Template in LXEdge, click on the Templates button in the main menu, select Series at the top of the screen, then select the Default Series Template under the Default Templates list.
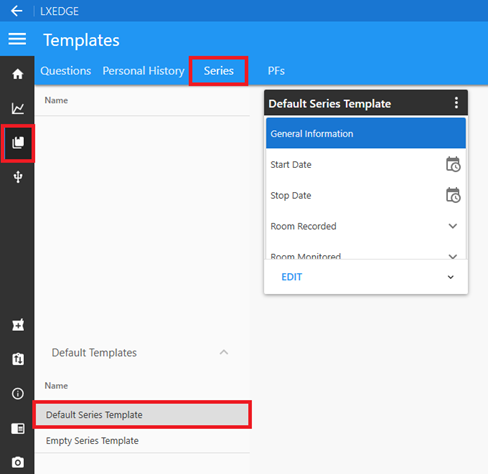
Find Series Template
When creating your first customized Series template, it's recommended to start with the Default Series Template. While you can also create personalized Series templates from other personalized templates, it's generally best to begin with the Default Series Template.
To create a new template from the Default Series Template, click the blue EDIT button on its card. This action generates a new template based on the Default Series Template, as it cannot be edited directly. A prompt will then appear to name the new template. Note that the EDIT button will allow you to directly manipulate custom templates.
New Series Template from Default
Series templates consist of groups and fields
Each component can be easily managed
Each field in a Series template can be configured with different data types. The available types are:
Field Options
All fields, except the Separator type, have several configurable options
These options make it easy to customize the templates to fit different testing scenarios.
Custom Fields
The ?Custom' field type lets you define a specific format using an Entry Mask, which controls the characters that can be entered. Refer to the table below for the mask characters and their meanings. Any characters in the mask not listed in the table must match the data entered exactly. Note that the mask only restricts the characters allowed at each position; it does not automatically format the input string.
| Mask Characters | |
| Character | Meaning |
| # | Numeric (0-9) |
| _ | Wildcard, matches any character |
| * | Wildcard, matches any character |
Example
To create a custom field that only accepts a property formatted Singaporean phone number without the country code, use the mask "#### ####". This mask ensures that the input consists of four numbers, a space, and four final numbers. Any deviation from this format, such as missing or additional spaces or numbers, or the use of any alphabetic characters, will result in an error and the chart cannot be started until it is corrected. The screenshot shows an example of an incorrectly entered Singaporean phone number and the warning that appears when a custom field has incorrectly entered data.
When you select the Default Series Template to edit you will see the following
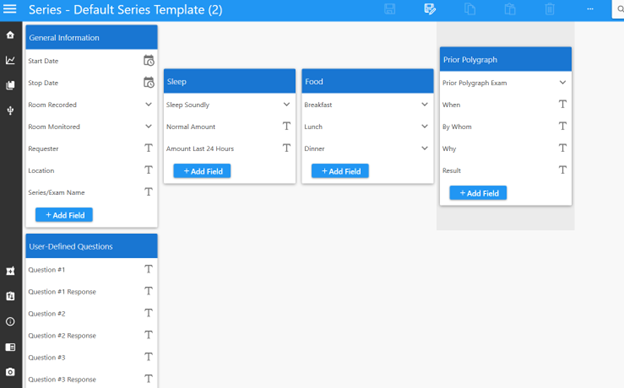
View Custom Series
Each of the default groups (General Information, Sleep, Food, Prior Polygraph, User Defined Questions) can be retained, edited or deleted based on your preference. Additional custom groups can also be created using the New Group + button at the bottom of the page.
To delete a group entirely, simply click on the blue header (in the example here the Food header. The section will highlight slightly gray and will show in Customization box to the right. Then click the trash can and the Group will be deleted. Note you can also delete fields within each group by clicking that field and then clicking the trash can.
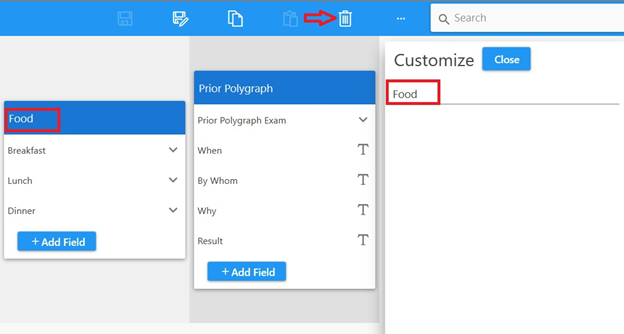
Delete Group
To edit a field within a group, click that field and it will highlight gray and show in the Customization box on the right (in this case Breakfast in the Food group). From the Customization box you can edit the field name, and it will change the field name in the group (For example, we changed Breakfast to Brunch).
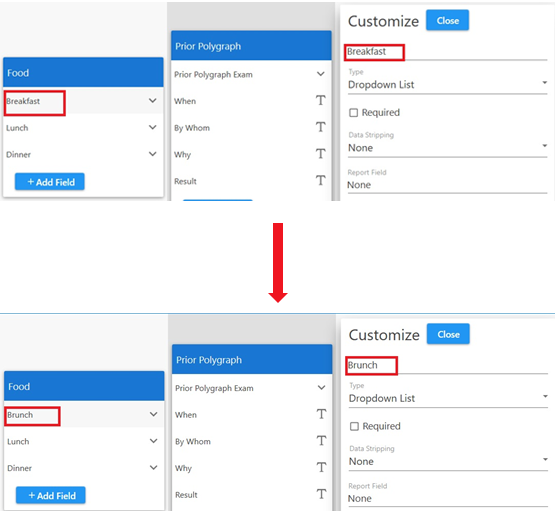
Edit Field
Once a customized Series template is ready, save it with its current name by selecting the Save button, or save it with a new name using the Save As... button at the top of the screen.
After creating custom Series templates, the Series templates page will list them on the left side, with user-defined templates at the top and the Default Series and Empty Series templates at the bottom. To view the details of or edit a custom template, click the blue EDIT button on the template card after selecting it from the list.
Viewing Custom Series Template
To delete, duplicate, or rename a custom Series template, select it from the user-defined Series templates menu, then click the three dots at the upper right corner.
Managing Series Templates
This video demonstrates how to create a custom Series template, manipulate and utilize various field types, and develop a PF Template using the new Personal History template. It also covers the creation of dropdown list fields.
Example Video
Unable find an answer to the question that you looking for in our FAQ section? Submit your question directly to our customer service representatives.
Join our email list for up-to-date product news Sign Me Up!
3700 Sagamore Pkwy N
Lafayette, IN 47904
Phone: (765) 423-1505
Fax: (765) 423-4111
info@lafayetteinstrument.com
Copyright © 2009 - 2026 Lafayette Instrument Company. All Rights Reserved.