Lafayette Instrument Company Field Functionality Check Instructions
Question Last Updated on: 7/16/2025
Much of this content was published by Blalock & Nelson (2018) and LIC is grateful to the authors for their work. This updated procedure supersedes any past procedure whether in the software or published elsewhere.
Lafayette Instrument and Limestone computerized polygraph instruments require no field calibration to function effectively. However, examiners may occasionally wish to verify that the recording sensors are in adequate functional condition and capable of capturing and recording information of normal interpretable quality. Hardware devices to check for problems or verify the functionality of the polygraph instrument and polygraph sensors are no longer commercially available from Lafayette Instrument Company (LIC). Instead, in field settings, LIC recommends examiners use the following simple procedures to verify correct functionality or ascertain the presence of problems in field settings.
Note: There is no specification or requirement regarding periodic checking the functionality of any Lafayette or Limestone computerized polygraph instruments. This is because functionality check procedures have no known effect on the validity of a polygraph test. Problems or faults with polygraph recording sensors are likely to be observed and corrected immediately during an exam.
For practical purposes, the acquaintance test will serve as a de-facto functionality check. There may be times when a field examiner may wish to conduct a Field Functionality Check to verify or check the functionality of a polygraph instrument and recording sensors, such as when a recording sensor problem is suspected or for some high-value polygraph cases.
The following is a simple procedure that can be executed for any polygraph instrument sold by LIC and can be accomplished in any field setting, without reliance on additional devices that are no longer available.
Preparation for the field functionality check:
- Visually inspect all sensors for damage
- Connect all sensors to the polygraph instrument and connect the instrument to the computer
- Wrap the cardio cuff around a jar, water bottle, or similar sturdy object (the cuff can also be inserted into a large coffee cup)
- Ensure the computer date and time are correct
- Launch and log into the polygraph software
- Create a new polygraph exam identified with the instrument serial number. If subsequent functionality checks will not be recorded in the same exam, then you can include the current date and your name in the exam name. (Some systems use arbitrary exam names).
- If an examinee name is required, use “Functionality Check.” If an examinee date of birth is required, use the current date.
- Initialize the data acquisition. (Some systems require that you initialize a new Series.)
- Adjust the gain for all sensors to any value equal to or greater than 1.
- Select the “Functionality Check” template
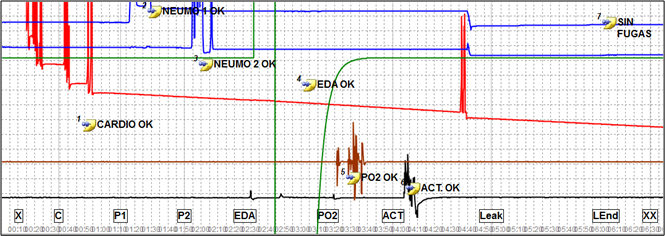
The Field Functionality Check question template should include the following items
| X |
Start the functionality check |
| C |
Cardio sensor check |
| TR |
Thoracic respiration sensor check |
| AR |
Abdominal respiration sensor check |
| EDA |
Electrodermal sensor check |
| VM |
Vasomotor sensor check |
| ACT |
Thoracic respiration sensor check |
| Leak |
Start the one-minute leak-down check |
| LEnd |
End the one-minute leak-down check |
| XX |
End the functionality check |
During the functionality check, simply press the space bar briefly for each item in the question template. It is not necessary to hold the space bar for the duration of each sensor check, nor is it necessary to press the space bar to enter an answer for each item. Wait for the question timer to expire before proceeding to each subsequent item in the question template.
Enter a comment or annotation for each sensor to indicate whether the sensor passes the sensor check (i.e. OK) or indicate if a sensor fault is observed. It may also be possible to enter notes into the exam, instead of adding comments or annotations to the chart data, to document correct functionality for each sensor.
After ensuring that the polygraph instrument is connected and initialized (i.e., acquired data are displayed onscreen), the procedure for the functionality check is as follows:
- Inflate the cuff to around 100 mmHg and squeeze it several times. Adjust the cuff pressure to about 65 mmHg and pinch the clamp.
- Start the recording of the chart data.
- X. Start the functionality check
Tap the space bar to start functionality check, then wait a few seconds before proceeding.
- C. Cardio Sensor Check.
Tap the space bar to check cardiograph response. Squeeze or press the cuff causing about 2mmHg increase in pressure, then hold for 5 to 10 seconds and release. You should see a deflection in the tracing. Enter an “OK” annotation or comment to indicate the cardio sensor is functioning as expected.
- TR. Thoracic Respiration Sensor Check.
Tap the space bar to check thoracic respiration transducer. Stimulate the respiration chest assembly by stretching it about ¼ inch or ½ cm, then hold for 5 to 10 seconds and release. (This can be accomplished by holding one end of the sensor firmly on a desk or table with the beaded chain extended over the edge and then stretching the sensor by the length of one or two beads.) The tracing should rise, hold, then return. Enter an “OK” annotation or comment to indicate the thoracic respiration sensor is functioning as expected.
- AR. Abdominal Respiration Sensor Check.
Tap the space bar to check the abdominal respiration transducer. Stimulate the respiration chest assembly by stretching it about ¼ inch or ½ cm, then hold for 5 to 10 seconds and release. (This can be accomplished by holding one end of the sensor firmly on a desk or table with the beaded chain extended over the edge and then stretching the sensor by the length of one or two beads.) The tracing should rise, hold, then return. Enter an “OK” annotation or comment to indicate the abdominal respiration sensor is functioning as expected.
- EDA. Electrodermal Sensor Check.
Tap the space bar to check the EDA sensor response. While connected to the DAS, do not connect the EDA sensors to a subject. Touch the unattached EDA leads together, then release or separate them. This should cause the signal to deflect sharply. Enter an “OK” annotation or comment to indicate the electrodermal sensor is functioning as expected.
- PPG Sensor Check.
Tap the space bar to check the PPG vasomotor sensor response. Pinch open the vasomotor sensor and point the open end towards a window or light source for a few seconds, then point the sensor away from the light source. The signal should deflect noticeably and then stabilize or return. Enter an “OK” annotation or comment to indicate the vasomotor sensor is functioning as expected. Place the PPG on your finger and ensure that a normal tracing of 2-4 chart divisions can be observed. You may need to use different fingers and/or gain setting to accomplish this.
- ACT. Activity Sensor Check.
Tap the space bar to check seat activity sensor response. With the seat activity sensor on a firm surface, lightly tap or press down on the activity sensor with your hand for a few seconds. You should see a deflection in the tracing, and the tracing should stabilize when the activity/stimulation has ended. Enter an “OK” annotation or comment to indicate the activity sensor is functioning as expected.
- Leak. One-minute leak-down Check.
Tap the space bar to start the one-minute leak-down check. First ensure that the cardio cuff is inflated to about 65mmHg and attached to a stable object such as a jar, water bottle or coffee cup. Be sure to note the starting mmHg shown in the software on the recorded chart.
Then attach the abdominal and thoracic respiration sensor to an empty chair. Tap the spacebar to initiate the one-minute leak-down check. Leave all components connected, and record data for one minute from Leak to LEnd.
- LEnd. End of One-minute Leak-down Check.
Tap the space bar to end leak-down check. The cardio sensor data should not move more than 5 mmHg during the one-minute leak-down check. Loss of more than 5 mmHg during the one-minute period may indicate a sensor fault. Enter an “OK” annotation or comment to indicate if the instrument and sensors have passed the one-minute leak-down check. If there is more than 5 mmHg loss of pressure in the two minutes, please contact LIC technical support to help troubleshoot the issue. The respiration tracings should not drop more than four chart divisions during the one-minute check.
- XX. End Functionality Check.
Tap the spacebar to indicate the end of the functionality check. Enter a final “OK” comment or annotation to indicate that the instrument and all recording sensors have passed the functionality check procedure.
- Stop the chart recording and save the functionality check as documentation or evidence that the instrument and recording sensors are functioning as expected.
The functionality check procedure can be conducted whenever a fault is suspected for any recording sensor. This procedure can also be used whenever it is useful to verify that the instrument and recording sensors are functioning as intended, such as before or after any high-value polygraph test where the functionality of the instrument may be questioned, or when an instrument or sensor has been replaced or serviced. There is no requirement or recommendation for periodic or scheduled functionality checks. It is also possible to verify during an acquaintance test, with a live subject, that each of the polygraph recording sensors is functioning correctly. All field practitioners should be familiar with the procedures to ascertain system or sensor faults or to verify the correct functionality of the polygraph and recording sensors.
References
Blalock, B. & Nelson, R. (2018) Practical Polygraph: How to Perform a Field Functionality Check, APA Magazine September October.